
5s
+1
Submission successful!

|


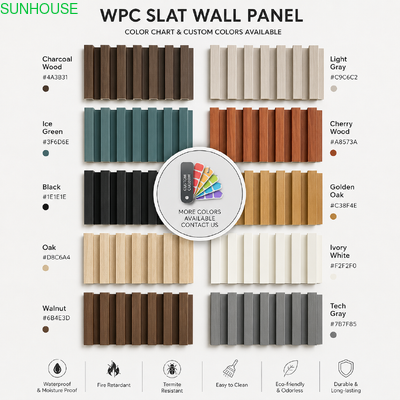
| Brand Name: | SUNHOUSE |
| Model Number: | WPC-08 |
| MOQ: | 200㎡ |
| Payment Terms: | T/T |
A complete WPC interior wall panel order should include more than the decorative panels. Trims, adhesives, screws, nails, clips, battens and corner accessories can directly affect installation speed, joint appearance and long-term stability.
Before bulk purchasing, buyers should confirm the wall condition, panel profile, installation direction, fixing method, accessory dimensions and finishing details. Missing or incompatible accessories can delay the project even when the wall panels themselves are ready for installation.
WPC fluted wall panels are usually installed as part of a complete decorative system. The exact accessories depend on the panel profile, wall shape and selected fixing method.
| System Component | Main Function | Buyer Confirmation |
|---|---|---|
| WPC Wall Panel | Provides the main decorative wall surface | Confirm profile, effective width, length, color and connection structure |
| Starting Trim | Finishes or positions the first panel edge | Check the trim opening against the actual panel thickness |
| Ending Trim | Covers the final cut edge of the installation | Confirm color, surface finish and visible trim width |
| Internal Corner | Finishes the joint between two inside wall surfaces | Confirm whether the corner is installed before or after the panels |
| External Corner | Protects and finishes exposed outside corners | Check impact resistance and color matching |
| Joint Profile | Connects sections or covers transition joints where required | Confirm whether the project design allows a visible joint strip |
| Adhesive | Bonds the panel or batten to a suitable substrate | Verify compatibility with the WPC surface and wall material |
| Nails Or Screws | Provide mechanical fixing through hidden panel edges or battens | Confirm fastener type, length, head size and corrosion resistance |
| Wood Or Metal Battens | Create a level fixing base over uneven walls | Confirm spacing, thickness, moisture condition and fixing method |
The most suitable fixing system depends largely on the flatness and condition of the existing wall. Direct installation can reduce material and labor requirements, while a batten or framing system can provide better alignment on uneven substrates.
Suitable for flat, stable, dry and clean wall surfaces. The panels may be fixed with compatible adhesive and concealed mechanical fasteners according to the panel design.
Can help level uneven walls and provide fixing points. The battens should be straight, stable, dry and suitable for the interior environment.
Often selected for commercial projects requiring a controlled framework. The panel profile and fasteners must be compatible with the selected metal system.
Adhesive and mechanical fasteners may be used together when permitted by the supplier's installation instructions and project requirements.
| Installation Method | Main Advantage | Main Limitation | Recommended Application |
|---|---|---|---|
| Direct Adhesive Fixing | Fast installation with limited wall projection | Requires a clean, stable and reasonably flat substrate | Renovation and interior feature walls with good substrate conditions |
| Adhesive Plus Hidden Nails | Combines initial positioning with mechanical support | Incorrect nail position may damage the locking edge | General interior installations where the panel design permits hidden fixing |
| Wood Batten Fixing | Helps correct uneven walls and creates a service cavity | Requires stable battens and additional wall depth | Uneven masonry walls and renovation projects |
| Metal Frame Fixing | Provides a controlled and durable support system | Requires suitable screws, spacing and professional installation | Commercial interiors and framed partition systems |
The fixing system cannot correct every substrate problem. The wall should be inspected before panels, trims and adhesives are ordered.
Adhesive selection should be based on the panel backing, wall substrate, installation environment and supplier instructions. A product described only as construction adhesive may not be suitable for every WPC panel and substrate combination.
| Adhesive Consideration | What Buyers Should Confirm |
|---|---|
| Material Compatibility | Confirm adhesion to both the WPC panel backing and the wall substrate |
| Initial Grab | Check whether temporary support is needed while the adhesive cures |
| Curing Time | Understand working time, adjustment time and full curing requirements |
| VOC Requirement | Confirm whether the project requires a low-emission interior adhesive |
| Temperature Range | Check installation and service-temperature limitations |
| Moisture Resistance | Select an adhesive suitable for the expected interior conditions |
| Fire Requirement | Confirm whether the adhesive affects the tested or specified wall assembly |
| Application Method | Follow the recommended bead size, spacing and surface preparation instructions |
Mechanical fasteners can improve positioning and holding strength, but they must be placed in the correct part of the panel. Fastening through a thin hollow section or too close to a locking edge can cause cracks, visible deformation or joint failure.
Often used as concealed support through an installation edge. The nail size and position should follow the supplier's profile drawing.
Suitable for fixing panels or clips to battens and metal framing. Pilot holes may be required depending on the profile and fastener location.
Some wall panel profiles use dedicated clips to allow controlled alignment and concealed fixing. Clips must match the exact connection structure.
Should only be used where accepted by the design. Fastener heads may require matching caps or another finishing treatment.
Starting and ending trims create clean vertical or horizontal edges around the WPC wall panel installation. Depending on the profile, the trim may be installed before the first panel, attached after the panel or fitted over a cut edge.
| Trim Type | Typical Position | Installation Detail To Confirm |
|---|---|---|
| Starting Trim | Beginning edge of the wall panel area | Check whether it controls panel alignment or only covers the edge |
| Ending Trim | Final exposed panel edge | Confirm the opening size and allowance for the cut panel |
| Top Trim | Upper edge below the ceiling or another finish | Check the ceiling line, panel movement allowance and visual width |
| Bottom Trim | Lower edge near the floor or skirting | Confirm whether it works with the selected skirting detail |
| Transition Trim | Connection between WPC panels and another wall finish | Confirm the thickness difference between the two materials |
Corners should be planned before the wall panels are cut. The project may use dedicated corner trims, mitre-cut panels, overlapping profiles or another custom detail.
Covers the joint where two wall surfaces meet inward. It can reduce the need for highly precise panel cutting at the inside corner.
Protects an exposed outside corner from impact and creates a consistent finished edge.
Can create a continuous decorative appearance but requires accurate cutting, stable profiles and experienced installation.
Aluminum or stainless-look trims may be used as a design feature when compatible dimensions and finishes are selected.
WPC materials can change dimension when temperature and environmental conditions change. The installation should allow appropriate clearances at wall ends, corners, ceilings, floors and fixed objects according to the supplier's technical instructions.
Wood battens can provide a level fixing surface, but unsuitable or unstable timber may cause later movement. The batten system should be designed according to the wall condition and panel installation direction.
Metal framing may be appropriate for commercial interiors, partitions and projects requiring controlled alignment. However, the wall panel should not be attached to thin metal sections without confirming the fastener type and pull-out performance.
| Metal Frame Item | What To Confirm |
|---|---|
| Frame Type | Confirm the gauge, profile and spacing of the selected metal support |
| Screw Type | Use screws designed for the metal thickness and required holding strength |
| Fixing Position | Align panel edges or clips with reliable framing locations |
| Backing Board | Determine whether an additional board layer is required behind the WPC panels |
| Service Cavity | Coordinate electrical wiring, lighting and other concealed services |
| Fire System | Confirm whether the framing, backing and decorative panel form part of a specified assembly |
Openings and service points require additional cutting, support and finishing accessories. Their positions should be confirmed before the final panel quantity is calculated.
Accessory quantities should be calculated by linear length rather than wall area. Each wall edge, corner, opening and transition should be measured separately.
A feature wall may require one starting edge, one ending edge, one external corner and finishing around a door opening. Each detail should be measured individually and matched with the correct trim profile.
Buyers should also consider the standard trim length. Offcuts from one location may not always be reusable when the wood grain direction or visible joint position must remain consistent.
| Accessory | Recommended Calculation Basis |
|---|---|
| Starting And Ending Trims | Total length of exposed beginning and ending panel edges |
| Internal Corner Trims | Total height or length of all inside corners |
| External Corner Trims | Total height or length of all exposed outside corners |
| Transition Trims | Total joint length between WPC panels and other finishes |
| Battens Or Framing | Wall dimensions, support direction, required spacing and perimeter support |
| Adhesive | Supplier coverage rate, application pattern and wall condition |
| Fasteners | Number of fixing lines, spacing and allowance for site loss |
| Installation Problem | Possible Cause | Recommended Prevention |
|---|---|---|
| Visible Gaps Between Panels | Uneven starting line, damaged connection edge or incomplete panel engagement | Check alignment continuously and assemble sample panels before installation |
| Panels Become Loose | Unsuitable adhesive, weak substrate or insufficient mechanical fixing | Test the complete fixing system before full installation |
| Panel Surface Is Uneven | Uneven wall, misaligned battens or overtightened fasteners | Level the substrate and support system before fixing panels |
| Locking Edge Cracks | Excessive force, incorrect fastener position or brittle panel structure | Follow the profile fixing points and avoid forcing tight connections |
| Corner Trim Does Not Fit | Trim opening does not match the actual panel thickness | Approve the panel and accessory cross-sections together |
| Adhesive Marks Appear | Excessive adhesive, incorrect application or contamination of the surface | Control bead size and clean excess material immediately with a compatible method |
| Panels Bow After Installation | Restricted movement, unstable wall, unsuitable storage or insufficient support | Follow storage, clearance and support recommendations for the selected profile |
Direct installation may be suitable when the wall is flat, dry, clean and stable. Uneven or damaged walls may require battens, framing or additional substrate preparation.
It depends on the panel profile, substrate, wall height and project requirements. Some systems use adhesive with concealed nails, screws or clips for additional support.
Buyers should not assume that every sealant or adhesive is suitable. Compatibility, bond strength, curing conditions and project-emission requirements should be verified first.
Not always, but trims usually simplify installation, protect cut edges and create a cleaner finish. Mitre-cut or customized corner details may be used when the project design requires them.
Matching accessories are generally easier to coordinate with the panel profile, thickness and color. Third-party accessories should be checked with physical samples before purchasing.
Installation over tiles may be possible when the tiles are firmly bonded, clean and compatible with the selected adhesive. Loose tiles, moisture and poor surface bonding should be addressed first.
Socket positions should be planned before installation. The project team should coordinate cutting, electrical-box depth, additional support and safe access to wiring.
We supply WPC fluted interior wall panels with matching starting trims, ending trims, internal corners, external corners and installation accessories for distributors, contractors, wholesalers and commercial projects.
Send us your wall dimensions, substrate condition, installation direction, selected panel profile, color, quantity and project drawings for panel calculation, accessory matching and wholesale pricing.


 english
 français
 Deutsch
 Italiano
 Русский
 Español
 português
 Nederlandse
 ελληνικά
 日本語
日本語
 한국
한국
 العربية
 हिन्दी
 Türkçe
 indonesia
 tiếng Việt
 ไทย
ไทย
 বাংলা
বাংলা
 فارسی
فارسی
 polski
